The Ultimate Guide to Overclocking Your Monitor Safely
Most people who tinker with their PCs know the drill when it comes to overclocking a CPU or GPU bump the clocks, stress test, pray. But monitor overclocking sits in a different category entirely. It’s quieter, less discussed, and frankly a little misunderstood. The idea that you can push your display beyond its factory refresh rate sounds almost too good to be true, especially when a 144Hz monitor costs real money and a 60Hz panel is what you’re stuck with. Here’s the thing: it often works. Not always, not perfectly, but enough that it’s worth understanding properly before you either dismiss it or dive in recklessly.
What Monitor Overclocking Actually Does
Refresh rate is the number of times per second your monitor redraws the image on screen. At 60Hz, that’s 60 frames per second maximum. At 144Hz, it’s 144. When you overclock a monitor, you’re telling the display and the GPU to communicate at a higher frequency than the panel was officially rated for.
The panel itself is the limiting factor. Every LCD, IPS, or TN panel has physical characteristics the response time of the liquid crystals, the timing controller chip, the signal pathway that determine how fast it can realistically operate. Manufacturers test panels and bin them. A panel that passes QA at 75Hz might have been manufactured on the same line as one rated for 60Hz. The silicon lottery, as overclockers call it, applies here too.
So when you push a60Hz monitor to 75Hz, you’re not breaking physics. You’re finding out whether the hardware already supports it and just wasn’t advertised that way. Sometimes the answer is yes. Sometimes you get flickering, dropped frames, or a screen that simply refuses to handshake at the new rate.
The Real Risks and Why They’re Often Overstated
Let’s be honest about what can go wrong. The two fears most people have are permanent damage to the panel and voided warranties. Both are legitimate concerns, but neither is as dramatic as forum horror stories suggest.
Panel damage from overclocking is possible in theory. If you push the timing controller beyond what it can handle and operate it there for extended periods, you could shorten the lifespan of the display. In practice, going from 60Hz to 75Hz rarely puts that kind of strain on the hardware. Going from 60Hz to 100Hz on a panel never designed for it is a different story you might see artifacts, pixel ghosting, or instability, and at that point you’re genuinely stressing components.
The warranty issue is more straightforward: yes, you almost certainly void it by overclocking. Most manufacturers don’t support it, and if you push the display too hard and something fails, you’re on your own. That’s the trade you’re making.
What people rarely mention is the failure mode is usually obvious and immediate. If a resolution or refresh rate isn’t stable, your screen will tell you flickering, black screens, signal loss, or the GPU driver refusing to apply the setting. The monitor isn’t going to silently degrade over months without warning. You’ll know.
How to Actually Do It
The process differs slightly depending on your GPU brand, but the logic is identical across all of them: you’re creating a custom resolution that specifies a higher refresh rate, then applying it and testing for stability.
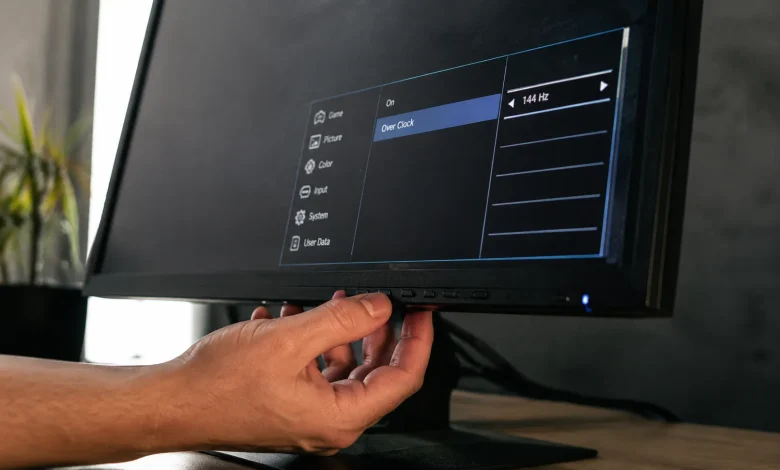
On Nvidia hardware, open the Nvidia Control Panel, navigate to “Change resolution,” and at the bottom click “Customize.” From there, create a custom resolution. Set your native resolution 1920×1080 or whatever applies and change the refresh rate. Start conservatively. If your monitor is rated60Hz, try 65Hz or 68Hz first. Not75Hz immediately.
AMD users find the same option inside Radeon Software under Display settings, where you can create a custom resolution profile. Intel integrated graphics also supports this through its own control panel.
Once you apply the new rate, the screen will go dark for a moment while the GPU tests it. If the image comes back and looks stable, that’s step one. The screen looking fine doesn’t mean it’s stable under load.
This is where most guides cut corners. You need to run a test. Open a browser-based tool like TestUFO or Blur Busters’ frame skip test. These tools display animations specifically designed to reveal whether your GPU is actually delivering every frame at the claimed refresh rate, or silently dropping frames. A monitor running at a nominal 75Hz that’s actually skipping every fourth frame isn’t running at 75Hz in any meaningful sense it’s an unstable overclock masquerading as a success.
Custom Resolution Utility for the Serious Tinkerer
If you want more control than the GPU vendor panels offer, Custom Resolution Utility CRU is the tool the overclocking community relies on. It’s a small Windows application that lets you define display timing parameters at a granular level, going well beyond what Nvidia or AMD expose in their interfaces.
The key concept in CRU is timing standards. By default, monitors use CVT or GTF timing, which have built-in blanking intervals small gaps between frames that give the display time to reset. Reduced blanking timing (CVT-RB) shrinks those gaps, which allows higher refresh rates over the same bandwidth. Many monitors that appear to top out at 60Hz on standard timing will accept 75Hz or even 85Hz on reduced blanking, because you’re essentially using the signal bandwidth more efficiently.
The tradeoff is that not all monitors respond well to reduced blanking. Some panels need that breathing room. If you use CRU, change one variable at a time and test thoroughly before pushing further. The incremental approach isn’t timidity it’s just how you isolate what’s actually happening.
Validating Your Overclock Properly
Stability testing for monitors is underappreciated. People apply a new refresh rate, watch a YouTube video, declare victory. That’s not a test.
Run the frame skip test for at least ten minutes. Play a fast-paced game that drives your GPU hard. Watch for tearing, flickering at the edges of the screen, or any moment where the image seems to hesitate. Check your GPU’s reported frame timing in something like MSI Afterburner’s overlay if you’re seeing frame time spikes that didn’t exist at 60Hz, your overclock is creating instability even if it’s not visually obvious yet.
Heat is worth monitoring too. The GPU has to work slightly harder to push signals at a higher refresh rate. For modest overclocks this is negligible, but if you’re running a hot system already, it’s another variable in the mix.
What Success Actually Looks Like
A stable monitor overclock is genuinely useful. The difference between 60Hz and 75Hz is subtle but real motion looks smoother, cursor movement feels more responsive, and fast-paced games have a perceptibly different quality. It’s not the transformative leap you get going from 60Hz to 144Hz on dedicated high-refresh hardware, but it’s tangible enough that people who achieve it tend to keep it.
The honest framing is this: monitor overclocking is a low-stakes experiment with occasionally meaningful rewards. It costs nothing to try, the risks are manageable if you proceed thoughtfully, and the worst realistic outcome is reverting to your original settings. What separates the people who do it well from the ones who end up frustrated is the willingness to test properly rather than assume a setting is working just because the screen didn’t go black.
Your monitor might have more headroom than the manufacturer ever told you. There’s only one way to find out.