Thermal Throttling: How to Drop Your GPU Temps by 10°C for Free
The Hidden Tax on Your GPU’s Performance
Your graphics card is lying to you. Not in any dramatic way, not with error messages or crashes. It’s a quiet lie a slow bleed of performance that happens when temperatures climb past a certain threshold and the card quietly starts pulling back on itself to survive. That process has a name: thermal throttling. And for a lot of PC gamers and creators, it’s the invisible ceiling sitting between them and the hardware they paid good money for.
Thermal throttling is the GPU’s built-in self-preservation mechanism. Once the chip temperature hits a manufacturer-defined limit typically somewhere between 83°C and 90°C depending on the card the driver starts reducing clock speeds to bring heat generation down. You don’t get a warning. Framerates just quietly drop. Render times stretch. The system feels sluggish in a way that’s maddeningly hard to pin down until you actually start monitoring temps while working or gaming.
The frustrating part is that it doesn’t take much. A 10°C reduction in GPU temperature can be the difference between a card running at full boost clocks and one that’s been sitting in throttle territory for the better part of an hour. And in most cases, getting that10°C back costs exactly nothing.
Dust Is the First Enemy, and Most People Ignore It
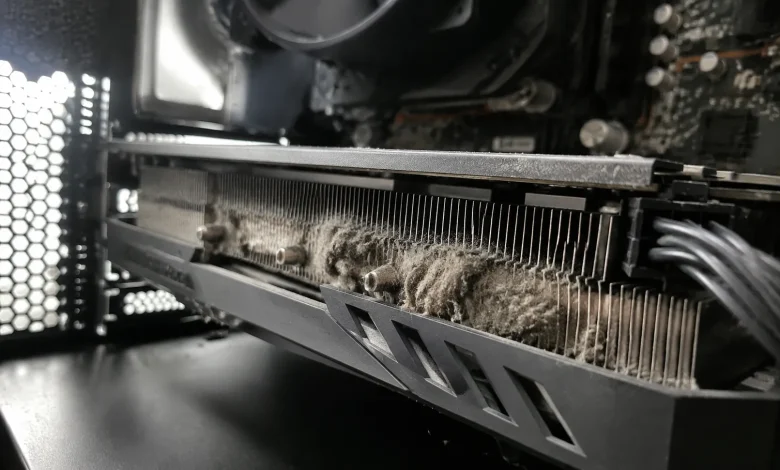
Before touching software or settings, open the case. Seriously. A GPU that’s been running for more than a year in any typical environment has almost certainly accumulated a layer of dust across its heatsink fins and fan blades. Dust is a near-perfect thermal insulator. It sits between the heat dissipation surface and the airflow, and it just quietly chokes the cooling system one micron at a time.
Cleaning the GPU doesn’t mean disassembling it. A can of compressed air and five minutes is enough. Hold the fans steady while you blast through the fins spinning a fan with compressed air can damage the bearing over time. Hit the heatsink from multiple angles, get the accumulated lint off the fan blades, and clear out whatever’s been sitting in the corners of the shroud.
In genuinely dusty environments, this single step alone can recover5°C to 8°C of thermal headroom. It’s the kind of unglamorous fix that gets overlooked because it feels too simple to matter, but the physics don’t care about your skepticism.
Airflow Inside the Case Matters More Than You Think
The GPU doesn’t cool itself in isolation. It pulls air from inside the chassis and exhausts heat out through the rear. If the ambient air temperature inside your case is already elevated because of poor airflow, the GPU is fighting an uphill battle before it even starts.
The general principle is straightforward: cool air should enter from the front and bottom, warm air should exit from the rear and top. If your case has front fans pushing air in and a rear fan exhausting, that’s the right direction. What silently kills that airflow is cable clutter sitting right in the path between intake fans and the GPU, or a case with no bottom clearance sitting flat on carpet.
Reorganizing cables away from the main airflow channel costs nothing except some time and a bit of patience. If you’re on a hard surface, make sure the case feet are actually elevating it enough for the bottom intakes to breathe. These aren’t exotic modifications. They’re just working with the physics instead of against them.
Fan Curves Are Free, and the Default Settings Are Conservative
GPU manufacturers ship their cards with conservative fan curves. The fans ramp up late and run slower than they could because the priority is acoustics out of the box. That makes sense for a product demo or a general consumer who prioritizes quiet operation. It doesn’t necessarily make sense for your specific use case.
MSI Afterburner is the standard tool for this. It’s free, it’s been around forever, and its fan curve editor is genuinely intuitive. The idea is to shift the curve so the fans spin up sooner and more aggressively as temperatures climb before the card has already baked itself into throttle territory.
A reasonable starting point: set the fans to hit 70% speed at around 70°C, rather than waiting until 80°C to get there. You’ll get some added fan noise, but the GPU will rarely see temperatures that trigger throttling. The thermal headroom opens up, boost clocks sustain longer, and the card actually runs the way it was designed to run.
Some cards, particularly those with semi-passive modes that keep fans off entirely at low loads, benefit from disabling that zero-RPM mode altogether. If you’re doing sustained workloads, passive operation at idle means the heatsink has already absorbed a baseline of heat before the fans even wake up.
Undervolting: The Part That Sounds Scary but Isn’t
This is where people hesitate, and understandably so. The word “voltage” carries implications of danger and instability. But GPU undervolting is one of the most genuinely impactful free performance moves available, and the risk profile is much lower than people assume.
Modern Nvidia cards in particular have significant voltage overhead baked in at the factory. The card will accept more voltage than it actually needs to hit its boost clocks stably. That extra voltage is waste heat, pure and simple. Undervolting finds the minimum voltage at which your specific chip can hit its target frequencies, cuts out the excess, and the result is less heat generated per clock cycle.
In Afterburner’s voltage/frequency curve editor accessed through the Ctrl+F shortcut you can grab the performance curve and lock it at a lower voltage point while maintaining the same clock speed target. The common approach is to identify where your GPU naturally boosts to (say, 1950 MHz), then set that frequency at a voltage point50to 100mV lower than what it currently runs at, and lock everything above that point to the same value.
After applying the curve, you test stability. Run a benchmark, run a stress test, run whatever workload matters most to you. If it crashes, you pull the voltage up a notch. If it holds, you might push the frequency slightly higher. The whole process takes an afternoon the first time. After that, the profile loads on startup and you never think about it again.
The thermal gains are real. A well-dialed undervolt on an RTX 3000 or4000 series card can drop temperatures by 8°C to 12°C under sustained load. Combined with a more aggressive fan curve, you’re looking at a GPU that runs significantly cooler, sustains higher clocks for longer, and in some cases makes less noise than it did before.
Thermal Paste and Thermal Pads: The Last Line
For those willing to go one step further though still spending nothing but time the thermal interface material between the GPU die and the heatsink base degrades over time. On cards that are three or more years old, the factory thermal paste may have dried, cracked, or simply lost its effectiveness.
Repasting a GPU involves removing the cooler, cleaning off the old compound, applying a fresh layer of quality thermal paste to the die, and reassembling. It’s a more involved procedure than cleaning or adjusting fan curves, and it does void warranties on newer hardware. But for an older card showing high junction temperatures despite clean fins and good airflow, dried-out thermal compound is often the culprit. People routinely report10°C to 15°C drops on aging GPUs after a repaste.
Some high-end cards also use thermal pads on VRAM modules and power delivery components. These pads compress against the heatsink and can harden over time. Replacement thermal pads are cheap, and on certain GPU models, degraded VRAM pads are a known contributor to elevated hotspot temperatures.
Putting It Together Without Spending a Dollar
None of this requires new hardware, aftermarket coolers, or custom water loops. The path to a meaningfully cooler GPU runs through the obvious and unglamorous: cleaning out dust, fixing airflow, adjusting fan curves, and spending an afternoon tuning the voltage curve to match what your chip actually needs rather than what the factory assumed it would tolerate.
The 10°C figure in the title isn’t a marketing stretch. For a GPU that’s been running hot in a neglected case with default settings, combining these approaches will typically exceed that number. The card runs closer to its thermal ceiling less often, boost clocks hold longer, and the system behaves like the hardware it actually is rather than the compromised version thermal throttling had been quietly enforcing.